We’ve all seen those tattoos that look like they belong in a sci-fi movie—gears, wires, and robotic parts peeking through skin like some high-tech peekaboo. Bio mechanical tattoo designs blend the organic and the mechanical in ways that make you wonder if you’re part human or part cyborg. It’s like having your own personal Transformer but way cooler and less likely to turn into a car.
Materials and Tools Needed for Designing Bio Mechanical Tattoo Templates
Our journey into designing bio mechanical tattoo templates demands precision tools, creative software, and rich inspiration to craft those perfect cyborg-human mashups that turn heads.
Essential Drawing Tools
We rely on mechanical pencils, fine-tip pens, and erasers for clean sharp lines. Graphite pencils ranging from 2H to 6B capture intricate shading and texture needed for that metal-versus-flesh contrast. Quality sketchbooks provide ample space for multiple iterations. Rulers and French curves ensure flawless mechanical symmetry without the robot accusing us of being sloppy.
Digital Design Software Options
We embrace Adobe Illustrator and Photoshop for vector precision and textural depth. CorelDRAW offers excellent control over mechanical elements, while Procreate on iPads delivers intuitive tactile sketching. Using these tools lets us tweak layer by layer and apply lighting effects that make those gears and wires pop as if alive and ready to transform.
Reference Materials and Inspiration Sources
We gather sci-fi movies like Blade Runner and The Terminator for cybernetic aesthetics. Anatomy books supply muscle and bone references critical for blending organic and mechanical seamlessly. Online tattoo galleries reveal trending designs and color palettes. Combining these resources fuels our creativity and keeps our templates both futuristic and humanely cool.
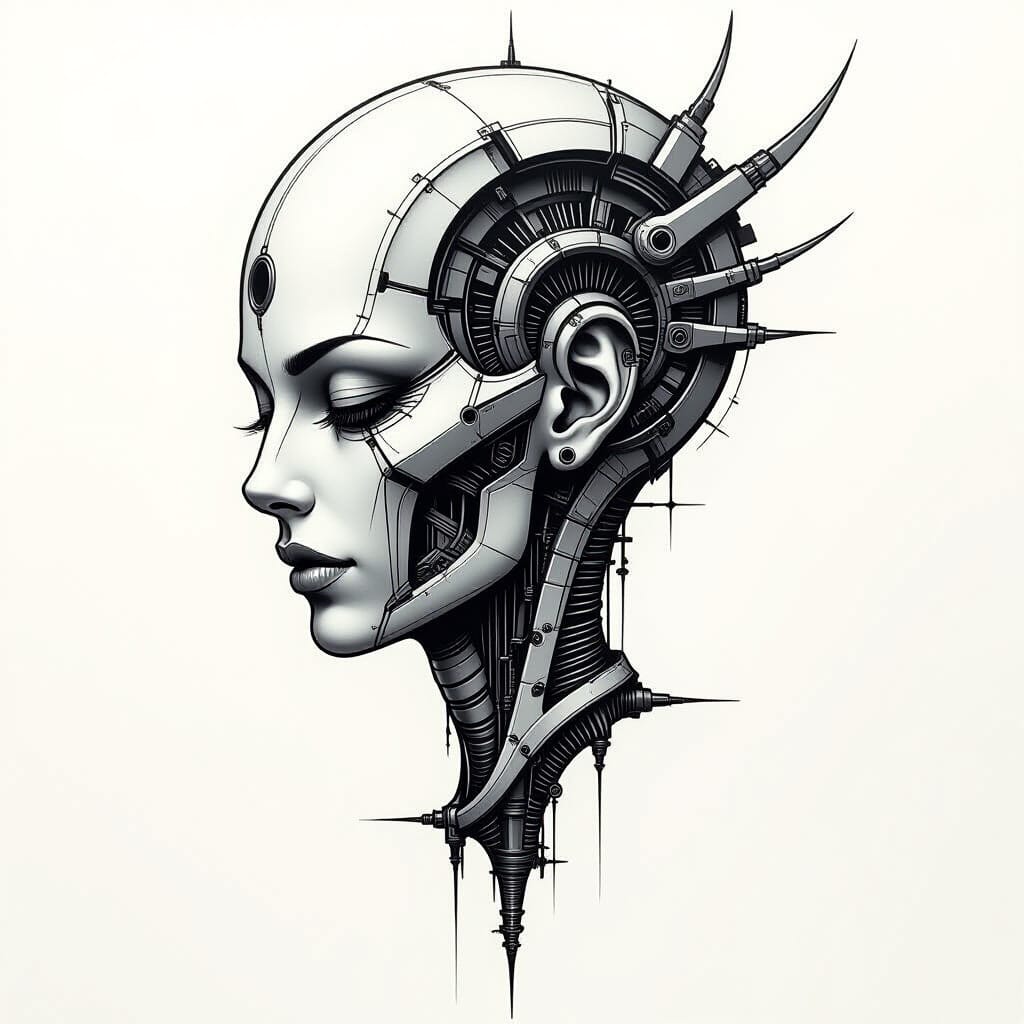
Understanding the Basics of Bio Mechanical Tattoo Designs
Bio mechanical tattoo designs combine the organic with the mechanical to create striking body art that looks like machinery is lurking beneath our skin.
Definition and History of Bio Mechanical Tattoos
Bio mechanical tattoos merge human anatomy with mechanical features such as gears, pistons, and circuitry. We trace this style back to the 1970s when artist H.R. Giger popularized the biomechanical aesthetic through his surreal sci-fi art. The tattoo world embraced it in the late 1980s and early 1990s, blending futuristic cyborg concepts with traditional tattooing to electrify skin art with a sci-fi flair.
Key Elements and Characteristics of Bio Mechanical Designs
Bio mechanical tattoo templates include intertwining metal parts and sinewy flesh. We look for detailed shading to create depth and a 3D effect. Designs often feature exposed muscles, joints, and tendons combined with robotic elements like bolts and tubing. The art strikes a balance between organic curves and mechanical precision, giving the illusion that human and machine fuse seamlessly.
Common Themes and Motifs in Bio Mechanical Tattoos
Popular motifs in bio mechanical tattoos include robotic limbs, artificial joints, circuit boards, pistons, and skeletal screws. We often see designs that simulate ripped skin revealing intricate machinery underneath. Themes focusing on cyborg identities, futuristic warfare, or enhanced human capabilities dominate. Engagement with sci-fi pop culture and anatomical accuracy intensifies the designs’ authenticity and visual punch.
Creating Your Bio Mechanical Tattoo Design Template
Crafting a biomechanical tattoo template demands a blend of creativity, structure, and a pinch of mad scientist energy. Let’s break down the process into manageable, thrilling steps.
Step 1: Conceptualizing Your Design Idea
Visualize the fusion of flesh and machinery. Picture robotic limbs twisting out of sinewy muscles or circuitry snaking beneath torn skin patches. Use sci-fi movies, anatomical sketches, or cyberpunk art as fuel for our imagination engines. Sketch a few concepts loosely to capture the vibe before committing to specifics.
Step 2: Sketching Basic Shapes and Mechanical Components
Map out primary shapes such as gears, pistons, and cables like mechanical skeletons beneath organic curves. Lay down simple circles, rectangles, and lines to carve the tattoo’s structural backbone. Embrace asymmetry because imperfect machinery loves character. Draft lightly so adjustments slide in without sweat.
Step 3: Integrating Organic and Mechanical Elements
Meld human anatomy and metalwork like a cyborg-artist hybrid. Connect muscle fibers to wires flowing seamlessly into rivets or panels extending from bones. Use smooth curves for skin blending into harsh edges on machinery. Place these joins thoughtfully to avoid a Frankenstein look but enhance the illusion of unity.
Step 4: Adding Details and Textures
Drizzle in shading, cross-hatching, and highlights to replicate depth and surface variances. Add scratches, bolts, and anatomical details like veins or tendons peeking through mechanical shells. Texture choices mimic materials like brushed steel or oily hydraulics, boosting realism. Layer details iteratively; too much chrome glare turns skin into a disco ball.
Step 5: Finalizing the Template for Tattoo Use
Scan or digitize the refined sketch ensuring all lines are crisp and shadows clear. Convert to vector files for scalability without pixel drama. Label sections with notes for the tattooist like shading directions or color hints. Verify design fit on body contour maps to prevent awkward stretching or distortion during tattooing. Now the blueprint stands ready to morph into wearable art.
Techniques for Designing Unique Bio Mechanical Tattoo Templates
Mastering a unique biomechanical tattoo template takes more than slapping gears on biceps. We dive right into the essential techniques that elevate these designs from generic to jaw-droppingly intricate.
Combining Human Anatomy with Mechanical Parts
Merging human anatomy and mechanical parts requires precision. We start by mapping muscles, tendons, and bones as the organic base. Next, we overlay mechanical components like pistons, gears, and circuit boards, ensuring their shapes complement natural body curves rather than clash. Using asymmetry adds realism since real machines and bodies rarely look mirrored. For example, an exposed robotic forearm might feature hydraulic tubing trailing alongside flexed muscles. This careful merging simulates living machinery rather than stale metal stuck on skin.
Using Shading and Contrast to Create Depth
Employing shading and contrast creates the illusion of depth, transforming flat sketches into three-dimensional feats. We layer shadows under mechanical plates to simulate them pressing beneath ripped skin. Highlights mimic metal gleams on sharp edges or reflective surfaces. Utilizing gradient shading around tendons illustrates muscle bulges, enhancing organic feel. Strong contrast between dark cavities and bright machinery parts adds visual pop, making each element stand out. Using various pencil hardness or digital brush opacity levels helps in sculpting surface variations down to microscopic scratches or wear marks.
Incorporating Movement and Flow in the Design
Integrating movement and flow ensures designs don’t look like frozen robots begging for oil. We design mechanical parts that follow natural muscle lines or joint articulation points, suggesting possible movement. Curved cables, flexible tubing, and segmented plates give the impression of bending and twisting. For instance, a biomechanical shoulder tattoo might exhibit layered gears rotating around a joint. Directional shading and line work guide the eye along these dynamic paths, creating a sense of life beneath skin. This choreography of metal and muscle avoids static illusions and crafts living bio-machinery you can’t take your eyes off.
Tips for Customizing Bio Mechanical Tattoo Templates
Customizing biomechanical tattoo templates lets us merge unique mechanical fantasies with individual human forms. Tailor every design thoughtfully to amplify the cyborg inside.
How to Tailor Designs to Different Body Parts
Match complex gears and pistons to muscle shapes because detailed parts sit better on rounded or flat surfaces. Adapt templates by stretching circuit lines over biceps or compressing them on wrists. Strengthen illusion by following natural body curves while placing robotic joints near real ones. Avoid awkward twisting by previewing designs in various poses or with a mirror reflection. Target placements like shoulders, forearms, and calves benefit from different scale sizes and component density, making the mechanical fusion appear more organic.
Adapting Templates for Different Tattoo Styles
Blend biomechanical themes with styles like realism, neo-traditional, or blackwork by tweaking textures and line weight. Emphasize crisp, shadowed details for realism but simplify shapes and add bold outlines for neo-traditional. Use negative space wisely in blackwork to mimic machinery shadows or glowing circuitry. Change color palettes from metallic grays and silvers to vibrant blues or reds to suit specific styles. Remember that fine-line engineering calls for precise needles while traditional styles handle thicker ink flow.
Personalizing Designs to Match Client Preferences
Listen carefully to input about favorite mechanical parts—whether sparks, pistons, or wires—and adapt templates accordingly. Incorporate personal symbols like initials hidden in circuit patterns or favorite sci-fi motifs to add character. Adjust element placement for comfort or style preferences such as minimal exposed skin or full robotic coverage. Suggest modular design options enabling clients to expand their tattoo cyborg story in the future. Finalize with mockups on client photos so they visualize the mechanical masterpiece before the first needle buzzes.
Common Challenges and How to Overcome Them
Designing biomechanical tattoo templates often feels like juggling gears while riding a cyborg unicorn. Let’s tackle the most stubborn challenges together and keep those machines purring.
Balancing Complexity and Readability
We crave complexity because sci-fi bodies don’t build themselves but cramming every gear and wire into a tiny arm risks turning art into a squiggly mess. Prioritize focal points like joint pistons or circuit boards and simplify background elements. Use contrast smartly by sharpening key lines and softening peripheral details. This approach ensures the design stays crisp whether it shrinks to a wrist or stretches across a back. Remember, if the machine’s too busy, skin won’t thank us.
Avoiding Common Design Pitfalls
We dodge cliché mechanical bits like rusty bolts or pipes that scream “budget cyborg.” Instead, innovate with unexpected elements such as bio-organic wiring or transparent components revealing intricate muscle tech. Avoid symmetry traps by introducing irregular shapes or asymmetrical gears to mimic natural muscle variance. Beware of clashing parts that might confuse the tattoo needle or the eye. Testing designs on 3D mockups prevents Frankenstein limbs and guarantees our creations remain wearable masterpieces.
Troubleshooting Template Adjustments
We embrace tweaks because human bodies refuse to be cookie cutters. If a piston looks awkward over a bicep or gears cluster too tightly around a wrist bone, scale or shift elements while maintaining mechanical logic. Use layer-based digital templates to isolate problematic parts and experiment without losing the whole design. When clients request last-minute changes, keep modular components handy for quick swaps. Flexibility in our templates stops the mechanical marvels from turning into chaos machines.
Alternative Methods and Tools for Bio Mechanical Tattoo Design
Exploring alternative methods and tools expands our bio mechanical tattoo design toolkit and sparks fresh creativity. Switching techniques challenges our artistic muscles and pumps new life into our templates.
Hand-Drawn vs. Digital Template Creation
Hand-drawn sketches capture raw, organic lines that digital tools occasionally smooth out too much. Using pencils, pens, and markers lets us mess around freely with shading, crosshatching, and texture variations in real time. On the flip side, digital creation slaps on layers of precision and tweakability via software like Procreate or Adobe Illustrator. We can zoom in to microscopic detail and undo mistakes faster than a robot rebooting. Digital templates also adapt effortlessly to different body contours using warp tools, while hand-drawing demands fresh sketches for major changes. When deadlines loom tight, digital templates speedworkflow up dramatically but let’s face it, nothing beats the satisfying squeak of a marker on paper when we’re brainstorming fresh cyborg limbs.
Using 3D Modeling to Visualize Designs
3D modeling software such as Blender or ZBrush brings biomechanical tattoo designs from flat sketches into fully rotatable, shape-shifting sculptures. We carve, stretch, and bend mechanical parts onto virtual muscles and skin to preview how gears align with biceps or pistons flex across forearms. Lighting controls highlight shadows and reflections, helping us evaluate depth and realism long before needle meets skin. If clients need persuasion, 3D previews turn skeptical yeses into enthusiastic heck-yesses by showing designs moving naturally with muscle flexes. Granted, mastering 3D takes patience and time—trust us, we’ve wrestled with polygon hell—but the dynamic perspective gained supercharges design accuracy and futuristic flair in our biomechanical templates.
Conclusion
Diving into biomechanical tattoo design is like giving your creativity a shot of high-octane fuel. We get to play mad scientists blending flesh and gears, crafting art that’s part human, part machine, and 100% awesome.
Whether you’re sketching with pencils or clicking away in digital wonderlands, there’s no shortage of ways to bring these mechanical marvels to life. So let’s keep pushing boundaries, mixing metal with muscle, and turning skin into sci-fi masterpieces that even Transformers would envy.
Frequently Asked Questions
What are biomechanical tattoos?
Biomechanical tattoos combine human anatomy with mechanical parts like gears and circuits, creating a futuristic, sci-fi inspired body art that looks part human, part machine.
What tools are best for designing biomechanical tattoo templates?
Recommended tools include mechanical pencils, fine-tip pens, quality sketchbooks, and digital software like Adobe Illustrator, Photoshop, and Procreate for precision and detailed shading.
Where can artists find inspiration for biomechanical tattoo designs?
Artists often look to sci-fi movies, anatomy books, and online tattoo galleries for references to create authentic and visually appealing biomechanical designs.
Who popularized biomechanical tattoo art?
Artist H.R. Giger popularized biomechanical designs in the 1970s, and the style gained broader recognition in the late 1980s and 1990s.
How do I start creating a biomechanical tattoo template?
Begin with conceptual sketches using sci-fi and anatomy references, sketch basic shapes and mechanical parts, then blend organic and machine elements seamlessly.
How can digital tools enhance biomechanical tattoo design?
Digital tools allow for precise line work, easy adjustments, layering, 3D modeling, and better visualization of how the tattoo fits body contours.
What advanced techniques improve biomechanical tattoo templates?
Focus on precision muscle mapping, shading for depth, adding movement flow aligned with body lines, and creating a dynamic, three-dimensional effect.
How do you customize biomechanical tattoos for different body parts?
Tailor designs to fit muscle shapes and curves, adjust mechanical elements to align naturally, and adapt styles or colors to client preferences for a personalized look.
What challenges do artists face with biomechanical tattoos?
Balancing design complexity with readability, avoiding clichés, maintaining flexibility for adjustments, and ensuring the tattoo remains wearable and visually clear.
What are the differences between hand-drawn and digital template methods?
Hand-drawn designs offer organic lines and immediate shading, while digital methods provide precision, easy modification, layering, and 3D visualization for improved accuracy.