Dotwork tattoos are like the pointillism of the ink world—tiny dots coming together to create something surprisingly epic. If you’ve ever wondered how those intricate designs pop without a single solid line, you’re in the right place. We’re diving into the basics of dotwork tattoo design, where patience and precision turn simple dots into stunning art.
Whether you’re a tattoo newbie or just curious about this quirky style, we’ll break down what makes dotwork tick. Spoiler alert: it’s not just about stabbing the skin repeatedly (though that’s part of the charm). So grab your imaginary tattoo gun and let’s explore how dots can make a big statement—one tiny point at a time.
Materials and Tools Needed for Dotwork Tattoo Design
Mastering dotwork tattoo design demands precision equipment and supplies tailored to this detailed art form. Let’s break down the essentials without poking around too much.
Essential Tattoo Equipment
- Tattoo Machine: Opt for a rotary tattoo machine for smoother dot placement and less noise than the traditional coil guns that sound like a buzzing swarm.
- Power Supply: Choose a reliable power supply with adjustable voltage to fine-tune needle speed, ensuring our dots behave themselves on the skin.
- Foot Pedal: Connect it to control the machine hands-free—perfect for when we want to keep both hands steady like a zen master.
- Disposable Gloves: Maintain hygiene with powder-free gloves in sizes that fit snugly, avoiding that awkward giant clown-hand look.
- Stencil Paper: Transfer our intricate designs onto the skin with precision using hectograph or thermal stencil paper.
- Tattoo Chair and Armrest: Position our clients comfortably so that their skin stays as cooperative as a cat on a sunny windowsill.
- Sterilization Equipment: Autoclaves or single-use disposable tools keep germs out of the picture and our reputation spotless.
Types of Needles Suitable for Dotwork
- Round Liner Needles (RL): Perfect for crisp, concentrated dots due to their tightly packed circular grouping.
- Round Shader Needles (RS): Useful when a softer dot is needed, these needles deliver a less punchy effect.
- Single Needle: The supreme sniper for dotwork artists aiming for ultra-fine detail; it takes practice but rewards with precision.
- Magnum Needles: Avoid these; dotwork relies on pinpoint dots instead of shading gradients.
Choosing the Right Ink for Dotwork Tattoos
- Black Tattoo Ink: Use a high-quality black ink with a rich pigment concentration to ensure bold dots without bleeding or fading.
- Diluted Ink: Diluting black ink with sterile water or mixing solution helps create those subtle dot gradients that bring design depth.
- Consistency: Select inks with a medium viscosity that don’t run like a toddler’s ice cream cone on a summer day.
- Safety: Always ensure inks are sterile and approved by regulatory bodies to avoid turning our clients into unintended Jackson Pollocks.
Understanding the Dotwork Tattoo Technique
Mastering dotwork demands an eye for detail. The technique uses dots to build images instead of lines or solid shading.
How Dotwork Differs from Traditional Shading
Traditional shading blends ink smoothly for gradients. Dotwork stacks thousands of tiny dots for texture. This method avoids smudging by spacing dots precisely. The spacing controls darkness—more dots mean deeper shadows, fewer dots create lighter areas. Dotwork tattoos achieve a grainy look others can’t match.
Creating Texture and Depth with Dots
Texture emerges by varying dot size and density. We use larger clusters for bold patches and smaller dots for subtle transitions. Depth forms from layering dots; overlapped areas appear raised. For example, floral dotwork uses denser dots in petals and sparse dots in leaves to mimic nature’s feel. This meticulous stacking tricks eyes into seeing three-dimensional details.
Importance of Patience and Precision in Dotwork
Patience drives dotwork’s success since misplaced dots scream like a toddler losing candy. Precision means steady hands—one wobble and the whole pattern screams “amateur.” We work slowly, placing each dot deliberately, which means sessions stretch longer than a Netflix binge. Precision tools and careful spacing keep our dotwork sharp and clean, turning tiny dots into tattoo masterpieces.
Step-by-Step Guide to Designing a Dotwork Tattoo
Designing a dotwork tattoo demands more than just sticking dots randomly. We break down the process to help us create stunning and precise designs that wow.
Planning Your Dotwork Design
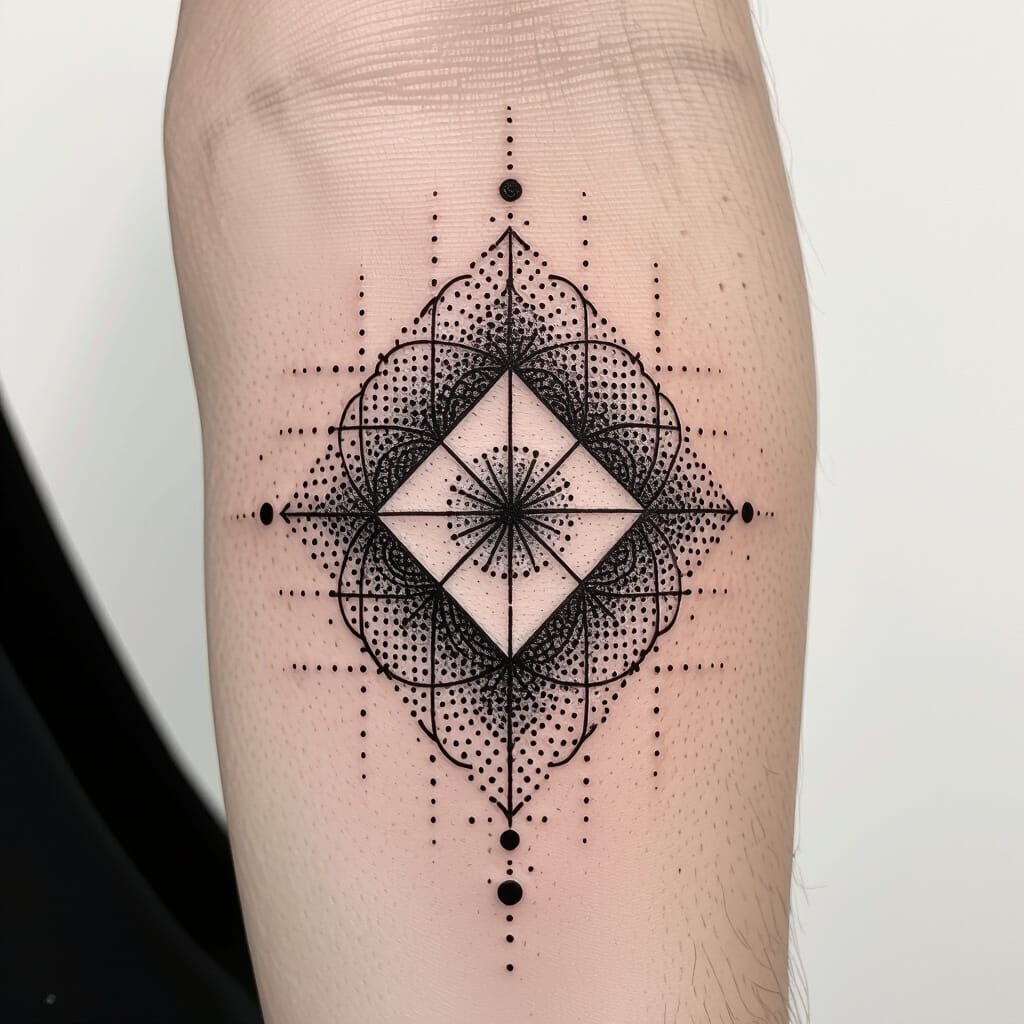
Start by selecting a clear concept that suits dotwork’s style. Use geometric shapes, mandalas, or nature-inspired elements. Sketch multiple thumbnails to explore patterns and compositions. Focus on balance because cluttered designs create dot confusion.
Sketching the Outline
Draw a clean outline with light pencil strokes to establish tattoo boundaries. Keep lines minimal since dotwork relies on dots, not traditional line art. Precision counts: shaky outlines make dot placement a nightmare. Use fine liners for clarity if needed.
Filling in the Design with Dots
Begin dotting methodically inside the outline using round liner needles. Place each dot deliberately to avoid overcrowding. Work from larger clusters toward smaller areas to maintain flow. Embrace patience since sprinting creates a spotty mess—not the goal.
Varying Dot Density for Shading and Effects
Control shading by adjusting dot spacing and size. Densely packed dots create dark shadows, while spaced dots form lighter gradients. Combine different cluster sizes to sculpt depth and texture. Keep pattern symmetry in mind unless chaos is the chosen style.
Tips for Perfecting Dotwork Tattoo Designs
Perfecting dotwork tattoo designs takes more than just poking ink with a needle. Master these key techniques to keep each dot worthy of a museum or at least a very impressed friend.
Maintaining Consistent Dot Size and Spacing
Keeping dots the same size and spacing requires steady hands and eagle eyes. Use a rotary machine to place dots evenly. Check needle depth regularly because uneven penetration creates inconsistent dots. Practice on synthetic skin or paper grids until muscle memory kicks in. Remember each dot counts, but too-close dots turn into blobs faster than you can say “Oops.”
Using Stippling Techniques Effectively
Stippling blends texture and shading with precision dots. Focus on layering: apply dense clusters for dark shadows and sparse dots for light areas. Start light and build gradually to avoid overworking skin. Work in small sections to keep detail sharp. If we want our designs to sing, we must avoid the temptation to go dot-crazy and keep control over placement and density.
Managing Hand Pressure and Movement
Steady pressure prevents blotchy or patchy dots. Light consistent pressure deposits clean dots, while too much causes ink blowouts. Move the hand smoothly to avoid jittery lines or uneven clusters. If our wrist gets tired, take breaks or switch positions; a shaky hand ruins more dotwork than a coffee spill. Precision beats speed every time in dotwork tattooing.
Common Mistakes to Avoid in Dotwork Tattooing
Mastering dotwork tattooing means dodging a few classic pitfalls. Getting these wrong can turn a masterpiece into a muddled mess.
Overworking the Skin with Too Many Dots
Poking the skin too often creates unnecessary trauma, leaving it angry and swollen. Tactics include limiting passes and allowing the skin to breathe because excessive dotting sacrifices precision and healing. Overload the canvas and risk scarring or ink blowout that ruins crisp details.
Uneven Dot Distribution and Spacing
Placing dots erratically results in patchy textures that confuse the eye. Techniques call for balancing consistent spacing and size since irregular dot patterns break the illusion of shading and depth. Uneven dots make a design look like a constellation of dropped snacks rather than fine art.
Ignoring Aftercare Specific to Dotwork Tattoos
Neglecting tailored aftercare invites infection and fades delicate dots faster. Following protocols on moisturizing and sun protection supports optimal healing because dotwork relies on crispness over smooth gradients. Skipping these steps turns neat dots into blurred smudges before the ink settles.
Aftercare for Dotwork Tattoos
Dotwork tattoos treat the skin like a delicate canvas dotted with precision. We must handle them with care to keep those tiny dots sharp and vibrant through the healing process.
Best Practices for Healing Dotwork Tattoos
Keep our dotwork tattoos clean with gentle washing twice daily using mild soap and lukewarm water. Pat dry gently instead of rubbing to avoid disrupting dot placements. Moisturize frequently with a thin layer of unscented lotion to prevent dryness without drowning the tattoo. Avoid scratching, picking, or rubbing as these actions erase painstaking dot details and cause scarring. Stay out of pools, hot tubs, or direct sunlight for at least two weeks because chlorine and UV rays dull the crisp dots. Loose clothing reduces friction and helps prevent irritation during healing.
Products to Use and Avoid
Choose fragrance-free, hypoallergenic moisturizers such as Aquaphor or specialized tattoo aftercare ointments to foster hydration without clogging skin pores. Avoid petroleum jelly that suffocates the skin and heavy creams that trap bacteria. Steer clear of exfoliants, alcohol-based products, and anything with strong chemicals that bleach or fade the fine dotwork. Sunscreen with at least SPF 30 becomes essential once fully healed; however avoid applying it on fresh tattoos to prevent irritation.
Signs of Infection or Complications
Watch for redness extending beyond the tattoo border, excessive swelling, increased warmth, or throbbing pain which signal infection. Pus, unusual discharge, or a foul smell requires immediate professional assessment. If blisters or severe itching develop, the skin may be reacting negatively to the ink or aftercare products. Persistent dullness or patchiness in the dots during healing might indicate overworking or skin trauma that needs rest and gentle care. Early detection can save a dotwork design from turning into a blotchy mess.
Troubleshooting Common Issues in Dotwork Tattoos
Even the steadiest hands face hiccups in dotwork tattoos. Let’s tackle common troubles without breaking a sweat or missing a dot.
Correcting Uneven Shading or Dotting
Spot uneven shading or dotting? Adjust dot density by adding smaller clusters where the design looks patchy. Space dots more evenly to smooth transitions. Resist the urge to hammer more dots in tight spots, or skin trauma becomes the unwelcome guest. Remember consistent hand pressure helps maintain uniform dots and shading fluidity.
Fixing Faded or Blurred Dotwork
Notice faded or blurred areas? Touch-ups call for sharper needle focus and slightly denser dot placement. Work carefully to avoid over-saturating the skin, which can blur fine details. Use fresh, high-quality ink for punchier dots and keep needle speed steady. Patient layering prevents blobbery nightmares and restores crispness.
When to Seek Professional Help
Face persistent patchiness, scarring, or infection signs like redness and swelling? Leave fixes to seasoned tattoo pros. Weigh safety over stubborn DIY attempts because botched fixes cause bigger headaches and blurry regrets. Regular check-ups during healing let experts intervene early to save your dotwork masterpiece.
Alternative Styles and Variations of Dotwork Tattoos
Exploring alternative styles and variations adds new dimensions to dotwork tattoos. Mixing techniques and themes keeps the art fresh and endlessly creative.
Combining Dotwork with Other Tattoo Techniques
Pairing dotwork with linework creates bold contrasts between sharp outlines and delicate dot textures. Incorporating geometric shapes delivers precision while dot clusters add organic depth. Blending dotwork with watercolor techniques introduces splashes of color that highlight intricate shading. Merging blackwork tattoos’ solid blacks with dot gradients builds dramatic visual impact. Mixing styles requires balance so neither overshadows the other but complements to elevate the entire design.
Popular Dotwork Tattoo Themes and Motifs
Nature-inspired dotwork motifs include mandalas representing harmony, sacred geometry symbolizing balance, and forests or mountains adding organic texture. Animal portraits use dense dot shading for realistic fur or feathers while retaining softness. Abstract cosmic scenes featuring stars and planets play with dot density to simulate vastness. Spiritual symbols rely on intricate stippling patterns to evoke depth and meaning. Popular themes revolve around precision and repetition, making dots perform double duty as art and message carriers.
Conclusion
Dotwork tattoos might look like a bunch of tiny dots, but trust us—they’re a whole lot more than that. With the right tools, steady hands, and a sprinkle of patience, those little dots can turn into jaw-dropping art that tells a story.
Sure, it takes practice and a bit of dot dedication, but hey, isn’t that part of the fun? So whether you’re thinking about getting inked or picking up the needle yourself, remember: every masterpiece starts with a single dot. Let’s keep those dots sharp and those designs sharper!
Frequently Asked Questions
What is a dotwork tattoo?
A dotwork tattoo is a style that uses tiny dots to create intricate designs, similar to pointillism in art. Instead of smooth shading, varying dot density builds texture and depth.
What tools are essential for dotwork tattoos?
Key tools include a rotary tattoo machine for smooth dot placement, round liner or single needles for fine details, high-quality black ink, a reliable power supply, and disposable gloves for hygiene.
How does dotwork differ from traditional tattoo shading?
Dotwork uses precise dots to build images and shading, rather than smooth gradients. The variation in dot density and spacing creates texture and depth.
What technique is important in creating dotwork tattoos?
Patience, precision, steady hand pressure, and careful spacing are crucial. Misplaced dots can ruin designs, so deliberate placement is needed for sharp, clean results.
How do I design a dotwork tattoo?
Start with a clear concept and minimal outline sketch. Then methodically fill areas with dots, varying density to create shading without overcrowding or losing flow.
What common mistakes should I avoid in dotwork?
Avoid overworking the skin with too many dots, uneven dot distribution, and inconsistent spacing to prevent scarring, patchy textures, or messy designs.
How should I care for a dotwork tattoo after getting inked?
Gently wash and moisturize with fragrance-free products, avoid pools and direct sunlight, and watch for infection signs to protect dot vibrancy during healing.
What causes faded or blurred areas in dotwork tattoos?
Faded or blurred spots often result from uneven dot density, improper needle focus, or poor aftercare. Touch-ups with sharper needles and adjusting the technique help.
Can dotwork be combined with other tattoo styles?
Yes, dotwork pairs well with linework and watercolor techniques, offering bold contrasts and intricate shading for creative, fresh designs.
What are popular themes for dotwork tattoos?
Common themes include nature-inspired art, animal portraits, abstract cosmic scenes, and spiritual symbols, all made impactful through precision dot repetition.