Tattoos are like storybooks we wear on our skin, and what better storytellers than animals? Whether it’s a fierce lion roaring or a cheeky fox sneaking around, illustrative animal tattoos bring a wild splash of personality to our bodies. They’re not just ink; they’re little masterpieces that show off our inner beast—or maybe just our love for furry friends.
We’ve all seen those tattoos that look like they jumped straight out of a comic book or a quirky sketchpad. That’s the magic of illustrative design—bold lines, playful details, and a touch of whimsy that makes every critter come alive. So, if you’re thinking about adding some animal flair to your ink collection, get ready to explore a world where creativity roams free and your skin becomes a canvas for some seriously cool creatures.
Materials and Tools Needed for Illustrative Tattoo Design Animals
Creating illustrative tattoo design animals demands precise materials and tools that capture the lively spirit and whimsical details of these artworks.
Drawing Supplies
Sketching begins with quality pencils 2B, 4B, and 6B for varied shading and line weight. Drawing pads sized 9×12 inches with smooth, heavy cardstock prevent accidental smudges. Fine liners in 0.1mm to 0.5mm widths ensure crisp outlines essential for that comic book punch. Erasers, both kneaded and rubber, let us sculpt and correct without turning the page into a fuzzball.
Tattoo Equipment and Inks
Tattoo machines need consistent power and smooth needle action. We recommend coil machines for bold lines and rotary machines for shading large animal patches. Needles in configurations like magnums 7 and liners 3 produce diverse textures and bold outlines. Black ink with high contrast anchors the design while pigmented colors like burnt sienna and turquoise offer playful touches. Sterile gloves and disposable tubes keep things clean and professional—because nobody wants a tattoo story ending in a horror tale.
Digital Design Tools (Optional)
Digital tablets such as iPad Pro with Apple Pencil or Wacom Intuos bring flexibility for edits and vibrant color tests. Software like Procreate or Adobe Illustrator rounds out tools for layering intricate animal patterns and adjusting compositions effortlessly. Digital backups also prevent heartbreak from lost sketches, letting us keep the ink flowing smoothly.
Research and Inspiration for Animal Tattoo Designs
Mastering illustrative animal tattoos demands serious groundwork. Understanding animals beyond cute looks ensures our designs burst with life and personality.
Studying Animal Anatomy and Behavior
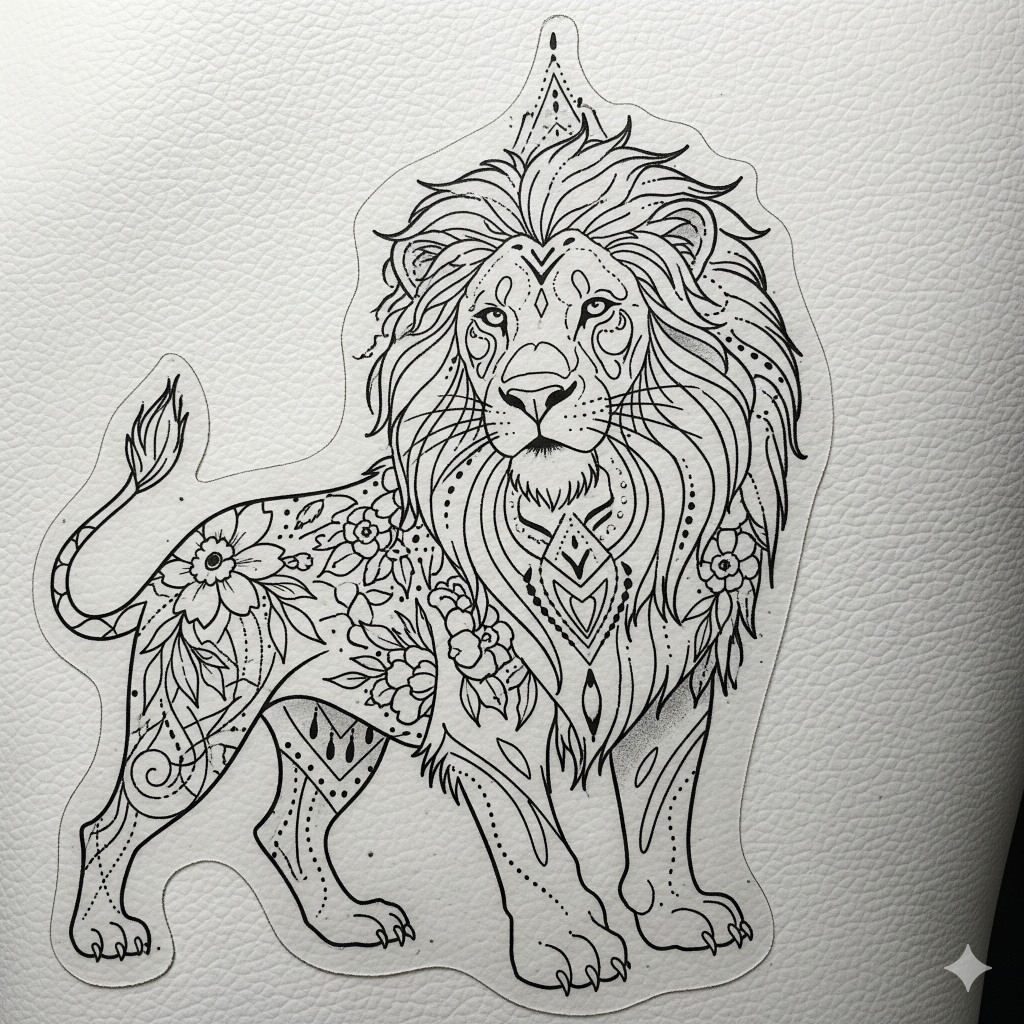
Observing animal anatomy reveals muscle shapes, fur patterns, and skeletal structures crucial for realistic tattoos. Noticing how a lion’s mane flows or a fox’s alert posture sharpens our depiction skills. Watching animal behavior exposes unique traits like the playful leap of dolphins or the graceful stretch of cats that inject motion into static ink. Ignoring anatomy or behavior risks lifeless, flat designs that scream “I Googled this.”
Exploring Different Artistic Styles
Diving into various art styles fuels creativity. Trying out bold comic book lines emphasizes whimsy and drama. Adopting watercolor washes softens the ferocity of a wolf or charm of a rabbit. Incorporating tribal patterns intensifies symbolism, while surrealist touches transform animals into dreamlike creatures. Sticking to one style unless we’re aiming for monotony drains inspiration and artistic flair.
Gathering Reference Images
Collecting a diverse range of reference images sharpens accuracy and originality. Using photos from wildlife documentaries colors realism. Examining historical art unlocks timeless motifs. Scrolling through tattoo portfolios reveals successful compositions and trends to inspire without copying. Relying on a single image hijacks creativity and blends our art into background noise.
Step-by-Step Guide to Designing Illustrative Animal Tattoos
Mastering illustrative animal tattoos requires a methodical approach. We break down the process into manageable steps to transform ideas into ink-worthy art.
Choosing the Right Animal for Your Design
Select animals that resonate with personality traits or stories we want to express. Consider 3–5 animals such as foxes for cunning, owls for wisdom, or elephants for strength. Research their anatomy and habits thoroughly; designs thrive on accurate representation. Pick animals with distinct features for visual impact.
Sketching Basic Shapes and Outlines
Start by mapping out 4–6 simple geometric shapes like circles and ovals to capture the animal’s proportions. Use light pencil strokes; they serve as invisible scaffolds. Connect shapes smoothly to form the anatomical framework. Keep outlines loose; precision arrives gradually, not in the first sprint.
Adding Details and Textures
Introduce defining characteristics such as fur patterns, feather arrangements, or scales. Use 2–3 different line weights for depth—for example, thick strokes for shadows and thin lines for whiskers. Incorporate texture techniques like cross-hatching or stippling to simulate animal skin or fur. Details elevate the design from basic sketch to dynamic visual story.
Incorporating Symbolism and Meaning
Fuse symbolic elements relevant to the chosen animal and personal narrative. For example, integrate flowers for growth or geometric shapes for balance around the animal’s form. Use 1–2 clear symbols per design to avoid chaos. Symbolism enriches the tattoo’s message without turning it into a cryptic puzzle.
Finalizing the Design for Tattooing
Refine all lines into clean, confident strokes suitable for stencil making. Limit color palette to 2–3 harmonious shades unless a multicolor splash fits the concept. Confirm proportions and spacing translate well to body contours. Save versions in high resolution for digital transfer and share with tattoo artists for feedback.
Techniques for Enhancing Illustrative Animal Tattoos
Illustrative animal tattoos come alive through specific design techniques. We shape these tattoos by mastering line work, color, contrast, and dynamic poses to make each creature snap off the skin.
Using Line Work and Shading
Mastering line work ensures crisp contours that keep the animal recognizable from a mile away. We employ varied line thickness — thick outlines anchor the form; thin lines add intricate fur or feather details. Shading adds dimension by mimicking shadows cast by muscles and natural curves. Cross-hatching works wonders on scales and fur texture. When shading, balance dark and light areas to avoid turning a majestic lion into a gremlin by accident.
Playing with Color and Contrast
Injecting color into animal tattoos brings vibrancy and personality. We select palettes that echo the animal’s natural hues while pushing boundaries for imaginative flair. High contrast between colors emphasizes key features like eyes, claws, or stripes. For example, blues and oranges or purples and yellows create eye-popping combinations without causing retinal fatigue. Using softer watercolor washes beside bold blocks of color makes the design feel like it’s dancing on the skin.
Creating Dynamic Poses and Movements
Static tattoos can look about as thrilling as a tax form. We energize animal designs by illustrating dynamic poses: a running cheetah mid-stride, wings unfolding in a majestic owl, or a twisting fox caught mid-pounce. Gesture lines guide movement direction while stretching or compressing limbs amplifies action. Animals captured in motion tell a story not written in words but etched boldly on flesh. This approach prevents our tattoos from just sitting there; they leap, soar, and sprint with us.
Tips for Customizing Illustrative Tattoo Design Animals
Customizing illustrative tattoo design animals transforms ordinary ink into personal masterpieces that speak louder than a growling bear. Let’s dive into how we can make these animal tats uniquely ours.
Personalizing Based on Client Preferences
Listening tops the list. We grab a client’s favorite animal traits, personality quirks, or backstory snippets and mold the design around them. Incorporating meaningful symbols like a compass for wanderers or tiny stars for dreamers cements personal connection. Tweaking fur patterns or adding playful accessories like glasses or hats injects character without overcomplicating. Precision matters since every detail ties directly into client identity.
Combining Multiple Animals or Elements
Merging animals with complementary traits spices things up. Imagine a clever fox paired with a wise owl to symbolize cunning and knowledge. Mixing floral vines or geometric shapes further ups creativity while maintaining balance. Layering textures maintains visual harmony even with multiple subjects. We blend elements thoughtfully so the tattoo sings instead of sounding like a zoo chorus.
Adapting Designs for Different Body Parts
Matching the animal’s natural flow with body contours anchors the design. For curved areas like shoulders or calves, we stretch or curve lines to keep dynamic movement alive. Flat spots such as forearms become perfect canvases for detailed designs that benefit from clarity. Size plays a starring role. Tiny paws suit wrists but demand simplified features, whereas backs handle sprawling compositions with intricate strokes. The body decides the story’s shape, and we follow suit with flair.
Common Challenges and How to Overcome Them
Illustrative tattoo design animals bring unique hurdles for artists and enthusiasts alike. Tackling these challenges head-on sharpens skills and guarantees eye-catching results.
Dealing with Complex Animal Patterns
Detail-packed fur, scales, feathers, or skin textures pose serious design obstacles. Simplify patterns by focusing on signature elements such as stripes on a tiger, spots on a leopard, or feathers on an owl. Emphasize key details with varied line weights instead of crowding the piece. Balance intricate sections with solid shapes to avoid turning the tattoo into a fuzzy mess. When in doubt, less complexity beats messy chaos every single time.
Scaling the Design Appropriately
Choosing the perfect size saves both skin and sanity. Tiny tattoos drown in detail; gigantic ones scream for endless sessions. Start by measuring the target body area. Then scale the design so that important features remain distinguishable from 6 inches away. Zoom out while sketching and squint often—if it looks like an indecipherable monster from across the room it’s time to resize. Remember animals don’t require microscopic stripes to roar visually.
Ensuring Tattoo Longevity and Clarity
Fading and blurring threaten crisp illustrative tattoos quicker than you’d expect. Boost longevity by selecting bold outlines and avoiding ultra-fine lines in high-movement spots like fingers or wrists. Maximize contrast through strategic shading combos with dark blacks plus vibrant colors for pop and durability. Consult experienced tattooists about pigment choices and proper aftercare regimens. Good ink plus good habits equals vibrant and legible tattoos for decades, not just Instagram stories.
Troubleshooting Common Issues in Animal Tattoo Designs
Mistakes happen even to the best artists, especially with intricate animal tattoos. We tackle the top design hurdles and show how to turn frowns into fierce feline grins.
Fixing Proportion and Symmetry Problems
Proportion disasters make animals look like they skipped gym day or hit one too many shrinks. Start by measuring key parts—head, limbs, torso—and comparing left and right sides as if auditioning for a wildlife pageant. Adjust uneven limbs or distorted features in the sketch phase, resizing with grids or tracing paper. If symmetry still looks off, flip the design horizontally to spot hidden imbalances like sneaky wobbly wings or lopsided snouts. Doing this early saves client grief and your sanity.
Correcting Color or Shading Mistakes
Color chaos often boils down to muddy blends or accidental clown palettes. Fix muddiness by layering colors gradually—think of it as animal camouflage, not a disco party. Shade with varied pressure to avoid flat spots, using lighter strokes for softness and darker tones to create depth. If colors clash harshly, mute one palette with complementary grays or subtle washes. Always test shades on practice skin sheets or digital canvases before committing to real epidermis to dodge rainbow regrets.
What to Do If the Design Doesn’t Translate Well to Skin
When killer line art looks like a chicken scratch on skin, time for plan B. Simplify intricate details; tiny dots or thin lines lose punch once inked. Scale up critical features so they retain impact after healing and fading. Consult the client about placement—curves and muscles warp designs like funhouse mirrors—opting for flatter surfaces if possible. Lastly, use bolder outlines to ensure longevity and clarity, turning “meh” into “wow” that ages like a fine tattoo.
Aftercare Advice for Illustrative Animal Tattoos
Taking care of illustrative animal tattoos after the needle’s done helps keep them looking quirky and fresh. Our tips make the healing process straightforward and effective.
Educating Clients on Proper Tattoo Care
Start by explaining that freshly inked skin behaves like a diva—moody and sensitive. Instruct clients to:
- Keep the tattoo covered with a sterile bandage for the first 2 to 4 hours.
- Wash gently with unscented soap twice daily using lukewarm water.
- Pat dry with a clean towel without rubbing like they’re polishing a trophy.
- Apply a thin layer of fragrance-free moisturizer 2 to 3 times daily to avoid drying.
- Avoid scratching or picking at scabs since that’s a sure way to invite distortion.
Emphasize that direct sunlight, swimming pools, and hot tubs are off-limits for at least 2 weeks, or the tattoo’s vibrancy may bid farewell prematurely. Spot-check healing regularly, and if irritation looks like a grumpy cat, advise consulting a professional tattoo artist or dermatologist.
Preventing Fading and Distortion
Maintain bold lines and vibrant colors by stressing:
- Using broad-spectrum SPF 30 or higher sunscreen whenever the tattoo is exposed.
- Wearing loose clothing to prevent constant friction against the design, which can blur details faster than a camera out of focus.
- Avoiding heavy sweating or rigorous workouts during the initial 2-week healing window to reduce swelling and ink displacement.
Remind clients that touch-ups aren’t tattoo fails but like giving their animal artwork a spa day. Proper aftercare keeps these whimsical creatures looking as lively as when they first sprang from the artist’s needle.
Conclusion
Illustrative animal tattoos aren’t just ink on skin—they’re little wild stories we get to carry around. Whether you’re a seasoned artist or just daydreaming about your next piece, these designs offer endless room for creativity and personality.
Sure, they come with their quirks and challenges, but hey, what masterpiece doesn’t? With a bit of patience, some good tools, and a splash of humor, we can turn any critter into a walking work of art.
So let’s keep pushing those creative boundaries and making sure every tattoo tells a tale as unique as the person wearing it. After all, life’s too short for boring ink!
Frequently Asked Questions
What makes illustrative animal tattoos unique?
Illustrative animal tattoos stand out due to their vibrant, whimsical style that often resembles comic book art. They showcase personal stories, individuality, and a deep love for animals, making each tattoo a creative and meaningful expression.
What tools are essential for creating illustrative animal tattoo designs?
Key tools include drawing supplies (pencils, paper), tattoo machines (coil or rotary), specific needle types, quality inks, and digital tools like tablets and design software for intricate patterns.
Why is animal anatomy important in tattoo design?
Understanding animal anatomy and behavior ensures the tattoo looks lively and realistic, helping artists capture accurate movement and proportions in their designs.
How do I start designing an illustrative animal tattoo?
Begin by choosing an animal meaningful to you, sketch basic shapes, and incorporate symbols that tell your story. Then refine lines and prepare a high-resolution design for tattooing.
How can line work and color enhance these tattoos?
Varying line thickness and adding shading create depth and dimension. Using high-contrast colors highlights key features, making the tattoo more dynamic and eye-catching.
How do I customize an animal tattoo design?
Personalize the design by including symbols or traits unique to the client, combining animals or elements, and adapting the tattoo to fit different body parts seamlessly.
What common challenges do artists face with these tattoos?
Artists often deal with complex animal patterns, appropriate sizing for visibility, and maintaining tattoo clarity and longevity, which requires simplifying designs and using bold outlines.
How can proportion and symmetry issues be fixed in a tattoo design?
Measure key features during the sketch phase and adjust proportions accordingly. Careful planning and correction before tattooing ensure balanced, symmetrical designs.
What aftercare is needed to keep illustrative animal tattoos vibrant?
Keep the tattoo covered initially, wash gently, apply moisturizer regularly, and avoid sun exposure and strenuous activities during healing to prevent fading and distortion.
Are touch-ups necessary for illustrative animal tattoos?
Yes, touch-ups help maintain color vibrancy and line clarity over time, especially if the tattoo is exposed to sunlight or natural skin changes.