Tattoos have been around forever, but there’s something about traditional old school tattoo sleeves that just never goes out of style. Maybe it’s the bold lines or the classic motifs like anchors, roses, and swallows that make us feel like we’re part of a timeless club — one with a secret handshake involving ink and a needle.
We’ve all seen those sleeves that look like a colorful storybook wrapped around an arm, telling tales of adventure, rebellion, and maybe a few questionable decisions. Whether you’re a tattoo newbie or a seasoned ink enthusiast, diving into the world of old school sleeves is like stepping into a living museum of badassery with a splash of nostalgia. So, let’s roll up our sleeves and explore what makes these designs so irresistibly cool.
Materials and Tools Needed for Traditional Old School Tattoo Sleeves
Crafting traditional old school tattoo sleeves demands precision tools and vivid materials that bring bold lines and classic motifs to life.
Tattoo Machines and Needles
Electric coil tattoo machines, known for their consistent power and reliability, dominate the creation of old school designs. Round liner needles sized 3RL to 7RL generate those thick bold lines, while magnum shaders like 7M1 or 9M1 handle the saturated colors and shading typical of traditional sleeves.
Ink Colors Commonly Used in Old School Designs
Old school tattoos sport a limited yet punchy palette:
| Color | Purpose |
|---|---|
| Black | Bold outlines and details |
| Red | Roses, hearts, and flames |
| Green | Leaves and vegetation |
| Yellow | Highlights and accents |
| Blue | Swallows and sailors’ motifs |
Our inks favor heavy saturation and long-lasting vibrancy to keep the classic look screaming for decades.
Stencils and Transfer Paper
Stencils crafted on thermal or hectograph transfer paper provide crisp outlines for consistent replication of iconic images. Using quality transfer paper keeps designs sharp and prevents warping while allowing easy adjustments on skin curves during application.
Aftercare Products for Tattoo Healing
Healing requires gentle care; fragrance-free lotions containing aloe vera soothe irritation. Antibacterial ointments prevent infection and promote recovery. We rely on breathable tattoo films and mild cleansers to keep sleeves crisp while skin regenerates through those adventurous rebellious weeks.
Planning Your Traditional Old School Tattoo Sleeve
Planning a traditional old school tattoo sleeve demands careful thought and a dash of boldness. We focus on theme, symbolism, artist collaboration, and placement to build sleeves that scream classic without shouting chaos.
Choosing a Sleeve Theme and Design Cohesion
Picking a sleeve theme anchors the entire project. We start with a central idea—nautical adventure, vintage Americana, or perhaps classic rebellion. Grouping elements like ships, roses, or skulls pumps cohesion into the sleeve. We mix motifs strictly within the old school style to avoid tattoo wardrobe malfunctions. Repetition of specific colors such as red and green ties all designs together, making the sleeve look like one badass story instead of a patchwork quilt.
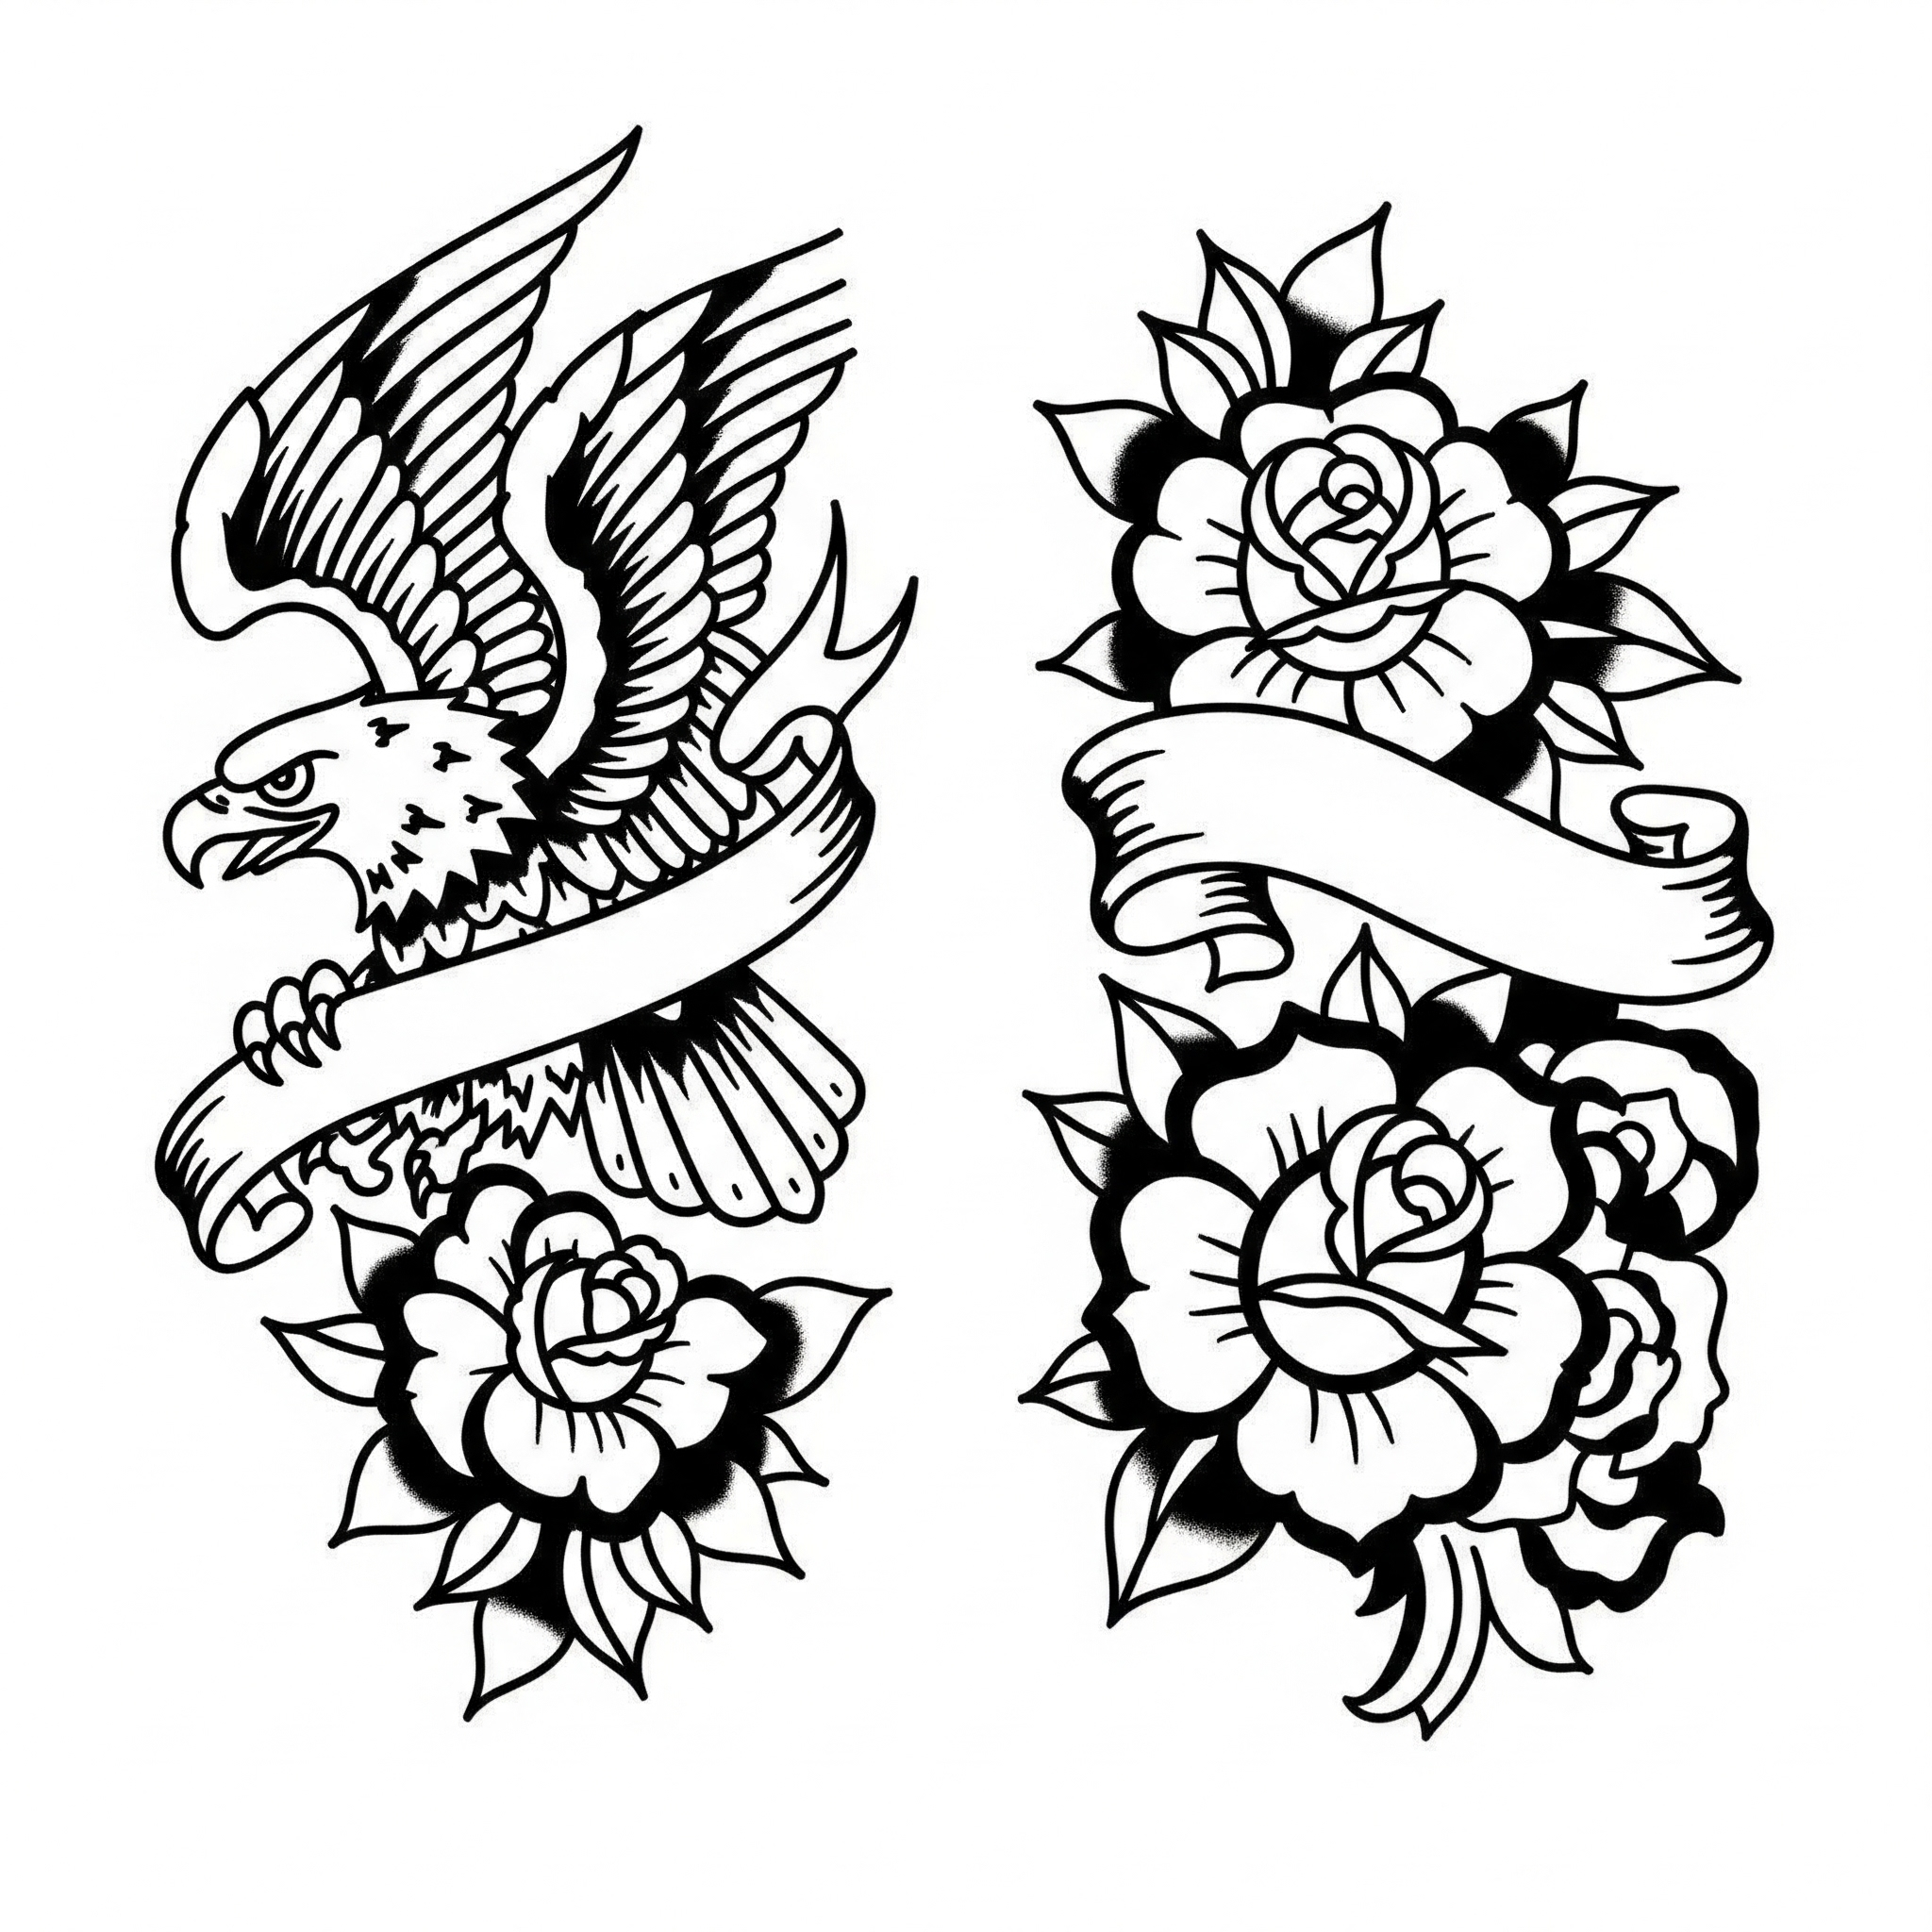
Common Motifs and Symbols in Old School Tattoos
Old school sleeves thrive on a handful of heavyweight motifs:
- Anchors symbolize stability and strength
- Roses shout passion and beauty with a thorny twist
- Swallows stand for freedom and loyalty, often in pairs
- Daggers show courage and defense
- Pin-up girls bring flirtatious charm
Each symbol dresses the sleeve in classic narratives guaranteed to turn heads and maybe spark a bar bet or two.
Working with a Tattoo Artist: Tips for Collaboration
We kick off by showing portfolios and voicing exactly what we want without resorting to vague descriptions like “make it cool.” Choosing an artist who crushes old school style cuts down revisions. We discuss pain tolerance upfront and schedule sessions accommodating skin recovery time; sleeves don’t happen in a coffee break. Signing off on stencil placement before needles touch skin avoids mid-tattoo surprises. Plus, bringing snacks and bad jokes never hurts the vibe.
Placement and Size Considerations for Sleeve Tattoos
Planning sleeve placement revolves around arm anatomy and daily life impact. Full sleeves demand commitment typically wrapping from shoulder to wrist. Three-quarter sleeves stop above the wrist offering a stealthier look. We remember knuckles and inner elbows tend to feel like battle zones; size and detail scale accordingly. Larger areas invite sprawling scenes while smaller spots focus on punchy, bold icons. We balance visibility with personal and professional lifestyle needs to keep tattoos rocking not shocking.
Step-by-Step Process for Getting a Traditional Old School Tattoo Sleeve
Getting a traditional old school tattoo sleeve demands precision, patience, and commitment. We break down the process into crystal-clear steps to avoid any accidental art disasters.
Consultation and Design Approval
We schedule the first powwow where ideas collide and themes emerge. We sketch boldly with anchors, roses, swallows, and flames, ensuring each element links harmoniously. We approve the final design only after it screams classic old school badassery and fits perfectly around your arm’s curves.
Preparing the Skin for Tattooing
We cleanse the skin like it’s about to star in a soap commercial, shaving away any stray hairs to create a smooth canvas. We apply a stencil for razor-sharp outlines, checking the placement under unforgiving fluorescents. We let the skin breathe, but no sudden moves—we’re about to make magic happen.
Tattooing the Outline: Techniques and Tips
We wield electric coil machines with steady hands, following the stencil’s bold lines exactly. We use thicker needles for those iconic chunky outlines, giving your sleeve that unmistakable punch. We remind ourselves that precision equals longevity; sloppy lines age like milk, not fine whiskey.
Adding Color and Shading in Old School Style
We layer vibrant reds, greens, yellows, blues, and jet-black shadows with needle sizes that pack saturation power. We build color slowly, saturating each patch to keep hues juicy and rebellious. We avoid over-shading to maintain that classic flat-old-school look instead of a modern watercolor mess.
Final Touches and Highlights
We pour over every inch to add punchy highlights and crisp edges, making tattoos pop under any lighting—daylight or dive bar. We seal the masterpiece with gentle aftercare advice, warning that healing gets itchy but scratching only ruins the vibes.
Aftercare for Traditional Old School Tattoo Sleeves
Our commitment to aftercare shapes how bold those anchors, roses, and swallows remain long after the ink dries. Taking care of traditional old school tattoo sleeves demands sharp attention from minute one through month twelve.
Immediate Post-Tattoo Care
Keep the freshly inked sleeve covered with sterile gauze for 2 to 4 hours unless the artist instructs otherwise. Gently wash the area using lukewarm water and fragrance-free, antibacterial soap after removal. Pat dry with a clean towel—no rubbing, no exfoliating, no enthusiastic scrubbing with your gym buddies. Apply a thin layer of fragrance-free, healing ointment 2 to 3 times daily for the first 3 days. Avoid submerging your arm in water for at least two weeks—no baths, pools, or spontaneous swimming contests please.
Long-Term Maintenance to Preserve Colors and Details
Moisturize your sleeve daily with a high-quality, fragrance-free lotion to keep skin supple and colors vibrant. Shield the tattoo from direct sun exposure by applying a strong SPF 30+ sunscreen every time you step outside—even under cloud cover or when convincing yourself you’re just grabbing mail. Schedule touch-ups as needed, especially in areas prone to fading like the inner arm or outer elbow. Hydration, sleep, and avoiding abrasive clothing also support long-term tattoo brilliance.
Avoiding Common Healing Problems
Ignore scratching urges to prevent scabbing or ink loss—resist the itch with distracting dance moves instead. Steer clear of tight or irritating clothing that might rub against the tattoo and cause inflammation. Watch for signs of infection such as excessive redness, swelling, pus, or fever and consult a professional if these symptoms appear. Keep in mind that overzealous cleaning or applying too much ointment can suffocate the skin and delay healing—moderation nets better results than overdoing it.
Troubleshooting and Common Issues
Even the boldest old school tattoo sleeves hit a few bumps on the road. Let’s tackle those pesky problems head-on to keep our sleeves looking fresh and fierce.
Dealing with Fading and Color Loss
Sun exposure drains vibrant reds, blues, and yellows faster than you can say “anchor tattoo.” Protect sleeves with SPF 30 or higher daily or risk witnessing your mighty swallow turn into a sad pigeon. Moisturize skin at least twice daily using fragrance-free lotion to prevent dryness that accelerates fading. Touch-ups by a skilled artist revive bold lines and saturated colors after 3 to 5 years of wear.
Handling Allergic Reactions or Skin Irritations
Redness and itching around the tattoo site often signal irritation or allergic reactions primarily caused by pigments like red and yellow. Wash affected areas gently with mild soap and cool water; avoid scratching. Apply a thin layer of hypoallergenic hydrocortisone cream for up to 3 days only if swelling or rash persists. Monitor symptoms closely; stop using any new products that coincide with the irritation.
When to Seek Professional Help for Your Tattoo
Swelling lasting more than 72 hours excessive redness pus or fever indicate infections requiring immediate professional attention. Sudden changes in tattoo texture or color demand a dermatologist’s evaluation to rule out allergic or other skin conditions. Consult your tattoo artist if design lines blur or colors fade unevenly; early touch-ups prevent costly fixes later.
Alternative Techniques and Styles Within Old School Tattoo Sleeves
Exploring alternative techniques and styles keeps old school tattoo sleeves fresh while honoring their bold roots. We dive into variations and fusions that add flair without losing that classic punch.
Neo-Traditional Variations
Neo-traditional tattoos retain the bold outlines and vibrant colors of old school designs while adding depth with shading and more intricate details. We include animals like wolves and tigers and flowers beyond roses to add complexity. Artists use softer gradients and varying line weights to create dimension without sacrificing clarity. For example incorporating ornate filigree or subtle textures enriches the design narrative. Neo-traditional keeps heritage intact but transforms it into wearable art with added sophistication.
Combining Old School With Other Styles
Mixing old school with styles like realism or Japanese irezumi creates dynamic contrasts that catch eyes. We might pair a classic anchor with hyper-realistic water splashes or blend bold roses with delicate sakura petals. The sharp solid lines of old school provide strong boundaries to balance more fluid or intricate sections. This combination works especially well on sleeves where different elements tell multiple stories while maintaining a unified aesthetic. Crossover tattoos offer a playground for creativity without abandoning tradition.
Customizing Traditional Designs for a Modern Look
Customizing traditional tattoos infuses them with personal meaning or contemporary trends. We modify colors using trendy hues like pastels or jewel tones instead of the typical reds and blues. Scaling up motifs for oversized boldness or scaling down for subtlety adapts old school energy to modern tastes. Adding geometric patterns or minimalistic backgrounds freshens designs while letting the classic imagery pop. Whether it’s a retro pin-up girl with a twist or a vintage compass surrounded by abstract shapes, customizing preserves roots through a modern lens.
Conclusion
Old school tattoo sleeves aren’t just ink on skin—they’re a bold shout-out to a timeless rebellion wrapped in vibrant colors and classic symbols. Whether you’re gearing up for your first sleeve or adding to a collection, these designs demand patience, precision, and a little bit of that “badass” spirit.
So, if you’re ready to wear your story loud and proud, remember: it’s all about the journey, the art, and the aftercare (yes, even the boring lotion part). Now, go forth and rock that vintage vibe with sleeves that’ll turn heads and maybe even spark a few jealous glances.
Frequently Asked Questions
What defines a traditional old school tattoo sleeve?
Traditional old school tattoo sleeves feature bold black outlines and classic motifs like anchors, roses, and swallows. They emphasize vibrant colors and simple, memorable designs that reflect adventure and rebellion.
Which colors are commonly used in old school tattoos?
Black is used for outlines, with red for roses and flames, green for leaves, yellow highlights, and blue for motifs like swallows. These colors create the classic vibrant palette.
What tools are essential for creating old school tattoo sleeves?
Electric coil tattoo machines, specific needle sizes for bold lines, stencils, and transfer paper are key. Precision tools help maintain crisp outlines and saturated colors.
How do I plan a cohesive old school tattoo sleeve design?
Choose a clear theme, such as nautical adventure or vintage Americana. Repeat motifs and colors throughout the sleeve to create a unified and bold story.
Why is a skilled tattoo artist important for these sleeves?
Experienced artists ensure strong lines, color saturation, and design flow. Good communication during planning sessions helps achieve the best personalized result.
What is the typical process for getting an old school tattoo sleeve?
It starts with consultation and design approval, followed by skin preparation and stencil application. Tattooing involves outlining, coloring, shading, and finishing with aftercare advice.
How should I care for my old school tattoo sleeve after getting it?
Keep the area clean, apply fragrance-free ointments, avoid scratching, moisturize daily, and protect the tattoo from sun exposure using SPF 30+.
What common problems can occur with old school tattoo sleeves?
Issues include fading from sun exposure, allergic reactions, or skin irritation. Persistent redness or swelling requires professional attention.
Can old school tattoo sleeves be customized or combined with other styles?
Yes, neo-traditional styles add depth and shading, while fusion with realism or Japanese irezumi creates unique, dynamic designs that respect old school roots.
How do I maintain the vibrancy of my old school tattoo over time?
Regular moisturizing, daily use of sunblock, and timely touch-ups help preserve strong colors and bold outlines for years.